

Perform a Physical Inventory using Parts Wizard on DealerTrack DMS using our Android Scanner
Table of Contents
Please note that you will have to schedule a Physical Inventory through our reservation page and Dealertracks' supplies site. Please follow this guide if you need help in doing either of those.
If you need to do bin checks and not a full physical inventory with sheets, then please refer to our Inventory guide, which can be found here.
Generating Count Sheets, Downloading Your Inventory, and Syncing the Scanners
1. Creating Count Sheets.
-Log in to DealerTrack DMS and then navigate to the Physical Inventory section.

-On the bottom of the screen, click on the "Add" button.

-Ensure that the following items are correct before adding the Sheets to your DMS
Type of Inventory: From Bin *FIRST to Bin *LAST
Manufacturer: All
Include Parts List*: Leave Blank
Bin Page Break Positions: All need to be checked
Sort Sequence: 1 Mfr, 2 Group, 3 Sort Part No, and leave Part Number Blank
Check Mark Left Justify Bin for Sort, Print Quantity On Hand, and Assign New Bin Location
Printer: QPRINT
Copies: 1
Output Type*: none
-The physical inventory selection options should look like the image below
Click Ok

-You will see the sheets added
Click Exit to exit out of the Physical Inventory Section.

2. Setting Up The Scanners For Syncing
-Launch the scan wizard app on the scanner
-Click on the Done Scanning button
-Verify that the screen displays Waiting on Command
If the scanner just displays connecting, or something else, give support a call
3. Downloading The Physical Inventory Sheets.
-Click on the Download button on PartsWizard, and choose "Download From DMS".

-Select the option for Inventory, and click on the check box for physical inventory sheets, with today's date. Click OK.

-This download can take a few moments to finish as it will be grabbing your inventory from the DMS and the sheets we've created.
-Once the download has finished, Partswizard will begin to automatically synchronize each scanner that is displaying the "Waiting on Command" screen. Once the Download Status box has disappeared, you will be ready to verify your sheets and bins.
4. Verifying Sheets and Bins Downloaded Properly.
-Ensure that the sheets tabs do not have duplicate parts.
-Ensure that the bins tabs do not have duplicate parts

-If you have duplicates in either the sheets or bins please give support a call
The Scanning Process
-Click on the inventory button on the scanner.
-Scan the bin location first.
-Scan the part numbers inside the bins. You can adjust the quantity in the QTY field by manually typing in the number and hitting Enter on the virtual keypad.
-Delete bad scans by typing 0 in the QTY field and hitting Okay on the confirmation pop-up.
-The scanner will have audible cues:
-Wrong Bin: This means that, according to the DMS, the bin selected does not match the bin it was in on the DMS.
-Unknown: This means that you’ve scanned a bad part number, or we do not have a record of this part, and will need to be
written in on Dealertrack as a yellow pad part.
Checking For Discrepancies, Mixed Bins, and Yellow Pad
1. Overview. This guide outlines the 6 reports in Parts Wizard to manage your physical inventory:
-Sheets: a report table that displays your inventory separated by each sheet.
-Bins: a report table that displays your inventory separated by each bin.
-Discrepancies: a report table that displays every part that has a variance in the scan count vs on-hand count.
-Yellow Pad: a report table that displays scanned parts that do not have a sheet and will need to be entered into Dealertrack as a yellow pad part.
-Mixed Bins: a report table that displays parts that have been scanned in a bin location that differs from what Dealertrack has on file.
-Raw Sheets: a report table that is unfiltered and displays everything downloaded and everything scanned.
These reports aid in validating scans and ensuring inventory sheets are posted correctly.
2. Standard Workflow
-Scan inventory to populate reports, ensuring scan count accuracy and proper bin location for part numbers.
-Use reports to validate scan counts and desired bin locations for parts scanned.
-Review variances in any report; 'Sheets' and 'Bins' reports have checkboxes to mark completed reviews for assistance in reviewing every bin and/or sheet.
-Sheets and Bin Reports contain two panels. Consider the one on the left, the Information Panel, which lists your sheet
numbers or bin locations in order
-Consider the panel on the right your Action Panel, as you're enabled to perform a multitude of actions to adjust scans
and more.
-Address 'Mixed Bins' report to update bin locations in Dealertrack; consider this your DMS update tool for selected part numbers and place the part numbers in the bins you’d like them to belong to.
-At a minimum, you should manually verify each bin in the 'Bins' report. Confirm scan counts and parts’ bin locations, marking each bin as reviewed once verified by checking the check box.
3. In-Depth View of Reports
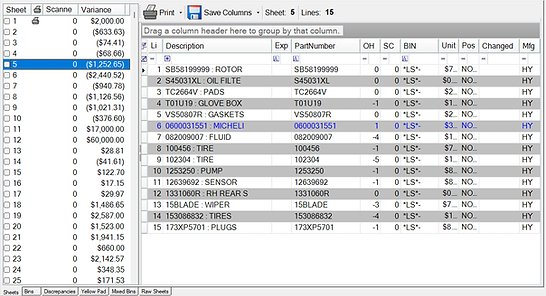
Sheets: The Sheets Tab arranges each sheet numerically, comprising two main panels: the Information Panel on the left and the larger Action Panel on the right.
Information Panel
-
Here you'll find several fields and options:
-
Checkbox: Indicates whether the sheet has been reviewed.
-
Sheet #: The number of the sheet.
-
Scanned Items: Number of items scanned in that specific sheet.
-
Variance: Difference between scanned items and what the DMS reports as the on-hand count and its unit cost.
-
-
Color Codes:
-
Red: Indicates a variance.
-
Green: Indicates no variance.
-
-
Right-Click Options: If you right-click in the information panel, you will get the following options:
-
Print Sheets: Prints the entire selected sheets.
-
Print Sheet Variances: Prints only the variances within the selected sheets.
-
You can select multiple sheets and print them at the same time by clicking on the sheet you want, holding that click, and dragging down until all the sheets you wish to print are highlighted.
-
Action Panel
The Action Panel contains detailed information about the parts that belong to your selected sheet.
1.The fields include:
-Line #: The line number for the part within the sheet.
-Bin Location: Where the item was physically scanned.
-Expected Bin: The bin where the item is supposed to be located according to the DMS.
-Part Number
-Description: Detailed information about the part number.
-OH (On Hand): The count of items on hand.
-SC (Scan Count): The count of scanned items.
-Error: Any errors or discrepancies.
-Unit Cost: The cost of a single unit of the item.
-Posted: Whether the item has been posted in the system.
-Changed: Indicates if there have been any recent changes to the part’s details and what those changes were
-Mfg (Manufacturer): The manufacturer of the part.
2.Right-Click options:
-Find Part Number [Shortcut: Ctrl-P]: Pops up a box showing you where each instance of this part number is found within the entire sheet, downloaded from the DMS.
-Zero Selected Scan Counts [Shortcut: Ctrl-Z]: Will set the scan count [SC] entry to 0 for the parts selected.
-Change Scan Count [Shortcut: Ctrl-S]: Will set the scan count entry to the new number you type in for the selected parts.
-Change Bin Location [Shortcut: Ctrl-B]: Will change the scanned bin location [BIN column] to a bin of your choosing. Think of this as the bin you want your part to be in when we post the inventory later.
-Repost: Will post any update to bin location or scan count for the part selected. This will be for the sheet number & line number location for the part and where you would refer too on the sheets table on the DMS to verify the correct changes. This will only repost for the parts highlighted
-Copy Part Number [Shortcut: Ctrl-C]: Will copy the part number selected
Bin Tabs: This tab also includes two main panels, the Information Panel and the Action Panel, similar to the Sheets Tab.
Information Panel
-
Here you'll find several fields and options:
-
Checkbox: Indicates whether the sheet has been reviewed.
-
Bin #: The bin location.
-
Scanned Items: Number of items scanned in that specific sheet.
-
Variance: Difference between scanned items and what the DMS reports as the on-hand count and its unit cost.
-
-
Color Codes:
-
Red: Indicates a variance.
-
Green: Indicates no variance.
-
-
Right-Click Options: If you right-click in the information panel, you will get the following options:
-
Print Bins: Prints the selected entire sheets..
-
Print Bin Variances: Prints only the variances within the selected bins.
-
Action Panel
The Action Panel contains detailed information about the parts that belong to your selected bin.
1.The fields include:
-Sheet #: The sheet number for the part within the bin.
-Line #: The line number for the part within the sheet.
-Expected Bin: The bin where the item is supposed to be located according to the DMS.
-Part Number
-Description: Detailed information about the part.
-OH (On Hand): The count of items on hand.
-SC (Scan Count): The count of scanned items.
-Error: Any errors or discrepancies.
-Unit Cost: The cost of a single unit of the item.
-Posted: Whether the item has been posted in the system.
-Changed: Indicates if there have been any recent changes to the part’s details and what those changes were
-Mfg (Manufacturer): The manufacturer of the part.
2.Right-Click options:
-Find Part Number [Shortcut: Ctrl-P]: Pops up a box showing you where each instance of this part number is found within the entire sheets we downloaded from the DMS.
-Zero Selected Scan Counts [Shortcut: Ctrl-Z]: Will set the scan count [SC] entry to 0 for the parts selected.
-Change Scan Count [Shortcut: Ctrl-S]: Will set the scan count entry to the new number you type in for the selected parts.
-Change Bin Location [Shortcut: Ctrl-B]: Will change the scanned bin location [BIN column] to a bin of your choosing. Think of this as the bin you want your part to be in when we post the inventory later.
-Repost: Will post any update to bin location or scan count for the part selected. This will be for the sheet number & line number location for the part and where you would refer too on the sheets table on the DMS to verify the correct changes. This will only repost for the parts highlighted
-Copy Part Number [Shortcut: Ctrl-C]: Will copy the part number selected
3.When a bin has been scanned in, manually review the bin report, and report any discrepancies
4.When you are satisfied with each line in the bin, mark the bin in the information pane checkbox
5.Repeat this process until you have reviewed every bin
Discrepancies: The Discrepancies Tab is designed to highlight every part that shows a variance between the on-hand count and the scanned count.
Information Displayed
-
Line Count: Shows the total number of items that have a variance.
-
Discrepancy Report Table: A detailed table displaying information for each part with discrepancies, line by line:
-
Sheet #: The sheet number for the part within the expected bin location
-
Line #: The line number for the part within the sheet.
-
Expected Bin: The bin where the item is supposed to be located according to the DMS.
-
BIN: The bin location where the part was physically scanned at
-
Part Number
-
Description: Detailed information about the part.
-
OH (On Hand): The count of items on hand.
-
SC (Scan Count): The count of scanned items.
-
Error: Any errors or discrepancies.
-
Unit Cost: The cost of a single unit of the item.
-
Posted: Whether the item has been posted in the system.
-
Mfg (Manufacturer): The manufacturer of the part.
Actions Available
-
Print: This will print the entire discrepancy report to a printer of your choosing
-
Right-Click Options: A detailed table displaying information for each part with discrepancies, line by line:
-
Find Part Number [Shortcut: Ctrl-P]: Pops up a box showing you where each instance of this part number is found within the entire sheets we downloaded from the DMS.
-
Zero Selected Scan Counts [Shortcut: Ctrl-Z]: Will set the scan count [SC] entry to 0 for the parts selected.
-
Change Scan Count [Shortcut: Ctrl-S]: Will set the scan count entry to the new number you type in for the selected parts.
-
Change Bin Location [Shortcut: Ctrl-B]: Will change the scanned bin location [BIN column] to a bin of your choosing. Think of this as the bin you want your part to be in when we post the inventory later.
-
Repost: Will post any update to bin location or scan count for the part selected. This will be for the sheet number & line number location for the part and where you would refer to on the sheets table on the DMS to verify the correct changes. This will only repost for the parts highlighted.
-
Copy Part Number [Shortcut: Ctrl-C]: Will copy the part number selected
Yellow Pad: Displays all part numbers that were scanned but are not yet in Dealertrack, meaning they lack bin location or other crucial information.
-
Input the required information: Bin, Manufacturer, Unit Cost, and Description per part
-
Check the box on the left side of each part to mark it as ready for upload
-
You can upload these parts individually by right-clicking on the part and choosing "Repost," or check all of the parts with the required information, and upload the sheets at the very end. The upload will include all yellow pad items checked as well.
Information Displayed
-
Total Line Count: Displays the total line count for yellow pad items.
-
Unknown Part Table: A table detailing each unregistered part's information
-
Expected Bin: The bin where the item is supposed to be located according to the DMS.
-
BIN: The bin location where the part was physically scanned at
-
Part Number
-
Description: Detailed information about the part.
-
OH (On Hand): The count of items on hand.
-
SC (Scan Count): The count of scanned items.
-
Error: Any errors or discrepancies.
-
Unit Cost: The cost of a single unit of the item.
-
Posted: Whether the item has been posted in the system.
-
Mfg (Manufacturer): The manufacturer of the part.
-
StkGr: Stock group this part may belong to
-
Error Message: Any error message that has been received from Dealertrack after attempting to upload the part as a yellow pad item
Right Click Options
-Find Part Number [Shortcut: Ctrl-P]: Pops up a box showing you where each instance of this part number is found within the entire sheets we downloaded from the DMS.
-Zero Selected Scan Counts [Shortcut: Ctrl-Z]: Will set the scan count [SC] entry to 0 for the parts selected.
-Change Scan Count [Shortcut: Ctrl-S]: Will set the scan count entry to the new number you type in for the selected parts.
-Change Bin Location [Shortcut: Ctrl-B]: Will change the scanned bin location [BIN column] to a bin of your choosing. Think of this as the bin you want your part to be in when we post the inventory later.
-Repost: Will post any update to bin location or scan count for the part selected. This will be for the sheet number & line number location for the part and where you would refer to on the sheets table on the DMS to verify the correct changes. This will only repost for the parts highlighted
-Copy Part Number [Shortcut: Ctrl-C]: Will copy the part number selected
-Check Selected: Marks the selected parts as ready for upload
-Check All: Marks all parts as checked and ready for upload
-Uncheck Selected: Unmarks the selected parts.
-Uncheck All: Unmarks all parts.
Mixed Bins: Displays all the parts that have been scanned in different bin locations than what DealerTrack reflects. This is where you can clear up any bin discrepancies and place parts in their proper locations.
Information Displayed
-
Total Line Count: Displays a cumulative line count for each part number that has been scanned into a varying bin location
-
Mixed Bin Part Number Table: Provides a comprehensive table detailing each part's information
-
Sheet Number: The sheet where the part is listed.
-
Line Number: Specific line on the sheet where the part can be found.
-
Bin: The bin where the item was physically scanned.
-
Expected Bin: The bin location according to the DMS.
-
Part Number
-
Description: Detailed information about the part.
-
On Hand: The current on-hand count as per the DMS.
-
Scanned: The count of the item as per the latest scanning activity.
-
Error: Shows any discrepancies between the expected and actual counts.
-
Manufacturer: The company that produced the part.
Actions Available
Hitting the expand button will display the Move to Scanned Bin and Move to Expected Bin options. Additionally, inputting the hotkey will select the corresponding option without expanding:
-Yellow Pad [Ctrl-Y]: Moves the selected items to the Yellow Pad Tab for further inspection or action.
-Discard [Ctrl-D]: Deletes the selected items from the Mixed Bins Tab.
-Move to Scanned Bin [Ctrl-S]: Moves the selected parts to the bin location where they were physically scanned.
-Move to Expected Bin [Ctrl-O]: Moves the selected parts to their expected bin location according to the DMS.
Select the desired option, and then click Apply Changes. This will move the part to the selected bin, or discard that part, or add that part to the yellow pad list.
Do this for all lines in the mixed bin report
Raw Sheets: The Raw Sheets Tab serves as a comprehensive platform to display all sheets and their individual lines that have been downloaded into the system. This tab offers an unfiltered view into the state of the inventory.
Information Panel
-
Line Count: Shows a count of all part numbers on a line-by-line basis, offering a high-resolution look at inventory.
-
Inventory Table: A table that contains in-depth information about each part number
-
Sheet Number: The sheet where the part is listed.
-
Line Number: Specific line on the sheet where the part can be found.
-
Bin: The bin where the item was physically scanned.
-
Part Number
-
Description: Detailed information about the part.
-
On Hand: The current on-hand count as per the DMS.
-
Scanned: The count of the item as per the latest scanning activity.
-
Unit Cost: The cost per unit of the part.
-
Posted: Indicates whether the data has been posted to the database.
-
Changed: Flags if there have been any changes to the data since it was posted.
-
ErrorMessage: Displays any system or operational errors associated with the part.
-
Manufacturer: The company that produced the part.
Action Panel
-
Find Part Number: Searches for a specific part number within the tab.
-
Zero Selected Scan Counts: Resets the scanned count for selected items to zero.
-
Change Scan Count: Allows you to manually update the scanned count of a part.
-
Change Bin Location: Enables changing the bin location for a selected part.
-
Repost: Allows for the reposting of updated data to the database.
-
Copy Part Number: Copies the part number to the clipboard for use in other applications.
-
Reconcile: Matches the scanned counts with the system counts, updating any discrepancies.
Posting Your Sheets, Yellow Pad Items and Optional Yellow Pad Entry via Dealertrack
1. Uploading Sheets: When uploading sheets, you will be updating Dealertrack with the sheets and their count numbers.
Do this once you have manually reviewed your variances and are satisfied with accurate counts.
-Click on the Post button on Parts Wizard
-Click on the upload count sheets button

-Wait for the upload to finish, you will get a final pop-up notifying what sheets and yellow pad items (only those with proper information inputted in the yellow pad tab) got uploaded
2. [Optional] Adding Yellow Pad Items via Dealertrack: If you have yellow pad items that you would like to upload to Dealertrack(Parts that are not yet entered into the DMS)and do not want to use our software to upload yellow pad items, you can do so afterwards through the DMS
-Click on the yellow pad option on the physical inventory screen on Dealertrack

-Click on Add
-Type in the part number, input a bin location, description, and unit cost.
Click Ok when done
-Repeat for each part that needs to be entered on yellow pad
3. Fixing the Outstanding Sheets: Click exit to get out of the yellow pad screen. Go back to the PI category and this time choose the 1st option, Enter Count.
You'll see a screen like this:

-To fix these sheets, type the sheet number, for this example that would be (98,195,292,389,486) and one by one type them into the sheet number field, click ok, and then click Ok.
-On the next screen

-Then click Ok. Do this for all the remaining sheets, then click cancel to get out of that page.

4. Checking the unit variance: Click on the drop-down arrow and select the option for unit variance, then click Enter.
You will see this screen:

This will be the final review, ensure that this unite variance is good with you before proceeding with posting and finalizing the PI.
Count < Computer is the physical count that is less than the computer count(DT)
Count > Computer is the physical count that is bigger than the computer count(DT)
If you wish to print or email a specific part of the unit variance, then simply hit the drop-down arrow and select either option.
To email, select the print option and hit Enter.
Then choose the output type. Typically, this will be CSV. Click Ok


Now type in the emails and hit send.
5. Posting Your Sheets: Now we are ready to post these sheets. To do so, go back into the Physical Inventory Category by clicking exit.
-Click on the drop-down arrow next to the sheets you created and scroll down, and choose option 9 for posting

-Click enter, and you'll be given this prompt

-Press Enter to finalize the sheets. It will take a couple of minutes but after its finished the prompt will disappear and you will no longer see the sheets