

User Guide for Using Pick-It
User Guide for Using Pick-It
Note: Before doing these steps, you must first perform an order or inventory download. To do so, click on the Download button and choose Download from DMS. Click Okay on the next pop up.
Step 1. Click on the Pick-It tab located in the blue navigation bar on the left.
Step 2. Click on the To Be Picked Button


Step 3. Click on the Picking Process Icon. It will be red, however, when you click it, the color will change to green.
Step 4. After it's finished downloading, your screen should get filled up with invoices. If not, try to close and reopen PartsWizard and go back to the To be picked screen. If they still don't show up, give Scansolutions support a call.
Step 5. Select each invoice that needs to be picked by clicking within the check box

Step 6. With all the invoices selected, click on the print button. This will print all your Pick-It invoice labels from the designated label printer that has already been setup. It's printed in efficient order, according to the zone map. You will start from the top label and work your way down.
Step 7. Start the scanner up and choose the Pick-It button

Step 8. Click the drop-down arrow to select the proper Login ID., This will reflect the user picking the order for the day, then click Sign-in.


You will see a screen similar to this after signing in:
Step 9. You can now start picking your parts. Start from the top label printed out, and work your way towards the bottom. When you find a part, attach the label to that part and then scan the label for Pick-It to keep track of the parts you have picked. Do this until you have all your parts accounted for and labeled.
9a. If there are multiple quantities of the same part, the scanner will say "Quantity". This means you should look on the roll of label printed to see how many parts you need to grab. You can scan each label individually, or you can type the amount you pulled in the quantity field. Attach each label to each part.
9b. If there are multiple quantities of the same part, but your inventory is either short, or some of the parts are damaged, you will be able to scan that printed label, and then click on the drop down arrow next to "Issues" and choose the issue you've come across. Hit Enter. This will reflect in the Errors Report when you're finished.
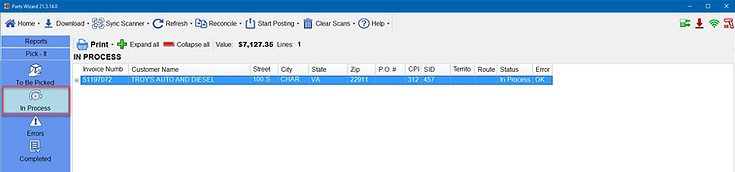
Step 10. When you're finished, you will want to review your Pick-It report so that you understand what invoices are still in progress, what invoices had errors or issues, and what invoices have been successfully completed.
10a. The In Progress tab reflects Invoices that have been started but has not been completed due to certain parts not being scanned in or picked yet.
10b. The Errors tab reflects all invoices that had issues when getting picked. This could be due to a shortage or a damaged part found.

10c. The Completed tab reflects all the invoices that have been successfully completed and picked.

Customization options for Pick-It
When you navigate to the To Be Picked Screen, you may want to customize the view, or even add new invoices added within the DMS, to the To Be Picked screen.
-With the Picking Process enabled, it should be green. Pick-It will be continually checking to see if any new invoices have been added. If Pick-It detects an updated invoice, it will download it, and you will notice the Refresh button flashing. To update the screen, simply click on the refresh button it will display the new invoices at the top of the list.
-You may want to sort the list. To do so, you simply click on a column heading, and it will sort that column from ascending to descending. If you click on it again, it will sort it from descending to ascending.

-You can also filter the list by clicking on the "A" icon within right underneath a column header. Doing this will give you some options to filter the list by. For instance, if you were to select the "Starts With" option, anything you type afterwards will filter the list to only show items that start with those letters or numbers typed. For example, if we typed "1234" in the Invoice Number column, it will only display invoices that start with 1234.
